I spent quite some time to create this bigger anchor crochet pattern. If you like a smaller and simpler pattern, you can try to follow the pattern I uploaded in another article earlier. Today, I can finally share the pattern with you and I’m quite happy with that 🙂
I’ve decided to make this pattern because I’ve got a request to make a bigger anchor pattern which fits on a baby blanket. (I’m so happy to get some feedbacks, so I was really happy to receive a request ♡ ) If you follow the instruction below and use size H hook (5mm) and medium weight yarn, the size of the finished work would be around 17cm x 17cm (6.7 inch x 7.6 inch). Of course, you can use whatever crochet hook you have and whatever yarn you would like to use! 🙂
This is how I use the applique. It looks good on my crochet bag 🙂 ♡
This time, the instruction will look slightly complicated (but not so difficult to follow), so I made a diagram to explain the pattern. I also wrote how to proceed the pattern in the picture just next to the diagram. For those who don’t like reading symbols, I will also explain in words. My tutorial “step” numbers are synchronized with the numbers written in the picture below. Well, let’s get started 😀
◆Anchor pattern in a crochet diagram◆
◆Abbreviations◆
- ch(s): chain(s)
- ss: slip stitch
- st(s): stitch(es)
- sc: single crochet
- hdc: half double crochet
- dc: double crochet
- tc: treble crochet
- dt: double treble
Step 1. Make a double magic ring. Ch 2. (1 hdc in the magic ring, 1 ch) three times. Close the loop of the magic ring. Ss to the 1st hdc.
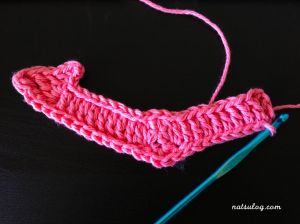
Step 2. Ch 12. 1 dc in the 4th st from the hook. 1 dc in each of the next 8 sts.
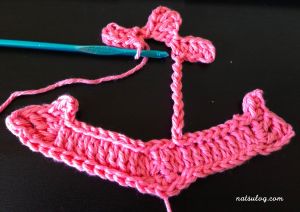
Step 3. Ss to the point A (shown in the picture below). (1 sc, ch 1 and 1 sc) in the next st.
Step 4. Ch 12. 1 dc in the 4th stitch from the hook. 1 dc in each of the next 8 sts.
Step 5. Ss to the point B (shown in the picture below). Ss in each st for the following 10 sts.
Step 6. Ch 3. 1 sc in the 2nd st from the hook. 1 hdc in the next st. 1 dc in the next st. 1 tc in the next st. 1 dt in the next st. Ch 1.
Step 7. Ss in each st to get to the point A. (for 12 ss)
Step 8. Ch 1. Ss in the following 3 sts. Ch 1.
Step 9. Ss for the following 8 sts.
Step 10-1. Ch 5. 1 tc in the next st, 1 dc in the next st.
Step 10-2. Ch 3. 1 sc in the 2nd st from the hook. 1 hdc in the next st. Ss to the bottom.
Step 11. Skip the next st. Ss to the following 8 sts. (You are now back in the point B.)
Step 12. Ch 14. 1 hdc in the 3rd st from the hook. 1 hdc in the next 3 sts.
Step 13. Ch 6. 1 dc in the 4th st from the hook. 1 dc in the next 2 sts.
Step 14. Ch 6. 1 hdc in the 3rd st from the hook. 1 hdc in the next 3 sts.
Step 15. 3 hdc in the next space. Ss to the next st.
Step 16. Turn the work and ss for the next 3 sts.
Step 17. 1 dc in the following 8 sts.
Step 18. Ss to the point C (shown in the picture below). Cut the yarn and trim the end. The bottom part is done 🙂
Step 19. Ch 10. Ss to the 1st st.
Step 20. Ch 2. 1 hdc in the bottom st. 2 hdc in each st of the row. (19 hdc)
Step 21. Ss to the 1st st of the row. Cut the yarn, leaving some length for the sewing purpose. Attach the top part to the bottom part of the anchor motif with the left yarn.
Now, this is done 😀
Thank you if you are with me till here 🙂
Enjoy decorating things around you!! 😀
If you have a blog, I’ll be definitely happy when you write about this pattern and your achievements. At that time, I can never be happier if it would have a link to my blog ♡♡♡
*** Added on November 2015 ***
I have opened a jewelry shop on Etsy. I try to make jewelry that I also can use in any occasions. Please have a look there by clicking the photo below.


Thank you so much for this wonderful pattern!!! Great job!!! 🙂
LikeLike
Thank you for your comments 🙂 I’ll be looking forward to seeing your finished projects ♡
LikeLike
Hello! Thank you for this pattern. It looks to be exactly what I’m looking for. Unfortunately, I am confused right from the start
“Make a double magic ring. Ch 2. (1 hdc in the magic ring, 1 ch) three times.”
I read that to mean make the “double” magic circle, (which I happen to be new with: is a “double” just wrapping the yarn over my finger an extra time?)
Then, 1 hdc and chain one x3 into the magic circle, then closing it up?
Thanks for your time,
Vee
LikeLike
And if I could add, when I do complete it as I read it, it looks nothing like your picture and when I close it, it does not make a “circle.”
LikeLike
I Crochet a lot using this method, you can go to you tube and it might make it better for you to visually see it in progress. Hope this helps. Debbi
LikeLike
Hi Vee,
Thank you for stopping by here!!
I’m super happy that you’ve found your way here and actually trying to make one of my patterns!
I’ve forgotten to attach a link to my blog page, explaining “how to make a double magic ring”.
I’ve added the link to the page now, so that I hope you’ll get a perfect circle in the end by following the instruction 😀
Basically, a double magic ring is a stronger/better way of starting a circle than just making a (single) magic circle.
You’ll wrap the yarn over your finger an extra time, and then ch 2. Then 1 hdc and chain one x3 into the magic circle, then closing it up as you’ve understood.
Hope this helps!!
I’ll be happy to help you anytime ♡
Happy crocheting.
Natsu
LikeLike
Thank you so so much for getting back to me so quickly! That did help tremendously.
I would love to share a picture of the final product with you, but I don’t see that option here? I made it for the bottom of a nautical-ish lapghan.
Thanks again!
LikeLike
Maybe this will work. This is the pin:
LikeLike
Hi Vee,
Thank you so much for sharing your photos!! That looks super cute!!
I’ve been asking my husband to change the comment form so that you can add photos directly on comments… and now you can add your photos there!
I’ll be happy for your photos to be posted on my blog comments so that a lot others can see your works 😀
LikeLike
Thank you so much for saying so!
As much as I struggled with this, the end result was appreciated by the giftee.
It was made to attach to the bottom of a nautical-inspired lapghan. It starts out like a blanket and comes together at the bottom to tuck in your toes! Original inspiration for the lapghan: https://www.madhooker.com/mermaid-lapghan/
LikeLike
Whoops, well I can’t see it but hopefully you can? lol
LikeLike
Hi Vee,
Thanks for posting a comment again! I don’t know why but I can’t see your photo…!! Maybe there are something strange with the system…? Anyway, thanks a bunch 😀 ♡
LikeLike
Thank you for this free pattern. However, I’m kind of lost. After step 4, it looks like after the 8 DC stitches you’ve gone through all the chains and I keep ending up with one extra. Also, it would help if you told me which stitch point A is….I can’t tell just by the picture… Am I going into a chain or the next hdc, or the same hdc I started with?
LikeLike
Hi thanks for trying it out and leaving me comments and questions! 🙂 Let me answer your two questions.
Your Question 1: After step 4, you should have 9 dc in total since “1 dc in the 4th stitch from the hook” and then “1 dc in each of the next 8 sts”. I think you have 9 dc… right? If so, you are right there with me 🙂
Your Question 2: Point A is the chain. In the top part of this blog entry, I also attached “anchor pattern in a crochet diagram” and if you can read the diagram, it might be easier for you to follow the diagram 🙂
Hope they will help you 😀 Happy crocheting ♡
LikeLike